🏠 Overview
Send2Pro is a secure, self-hosted file transfer platform designed for professionals who need to exchange files with clients safely. Files are transferred over HTTPS and can be scanned for malware using MetaDefender Cloud's 30+ antivirus engines.
Key capabilities available to you as a user:
| Feature | Description |
|---|---|
| Secure Upload | Upload files over an encrypted HTTPS connection directly to your account. |
| Virus Scanning | Scan any file with MetaDefender Cloud — powered by 30+ antivirus engines. |
| Share Links | Generate a one-click upload link so others can send files to your account without needing to log in. |
| Email Share Links | Deliver an upload link straight to one or more recipients' inboxes, with an optional custom message, all from within Send2Pro. |
| Auto-Expiration | Files are automatically deleted after 30 days to keep your account tidy and secure. |
| Download & Manage | Download, view scan results, or delete files at any time from the My Files page. |
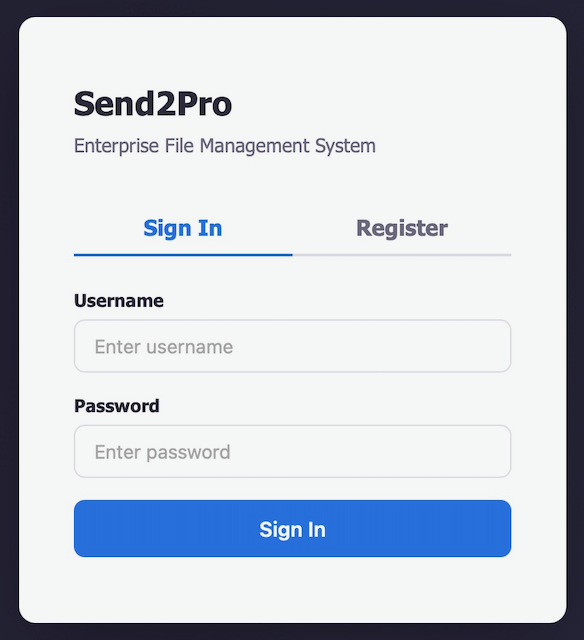
🔒 Signing In
When you visit your Send2Pro instance, you'll see the sign-in screen. Enter the credentials provided to you by your administrator or professional contact.
Navigate to your Send2Pro URL in any modern web browser (Chrome, Firefox, Safari, or Edge). The URL will look something like https://yourcompany.send2pro.com.
Type your Username and Password in the sign-in form.
You'll be taken to the My Files page where you can see all your uploaded files.
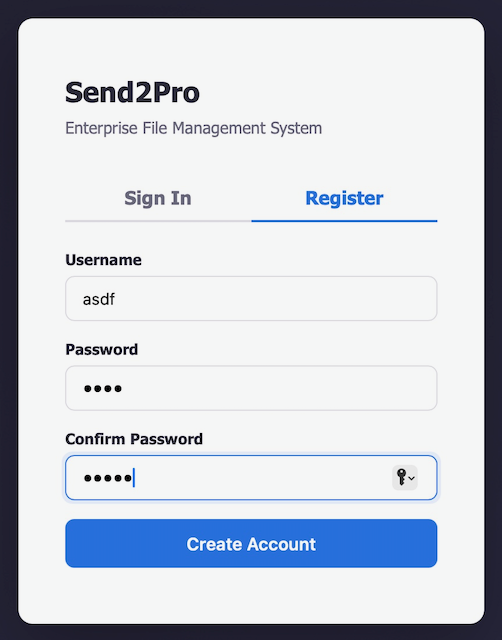
📝 Creating an Account
If your administrator has enabled self-registration, you can create your own account directly from the login page.
On the sign-in screen, switch from the Sign In tab to the Register tab.
Choose a Username (at least 3 characters) and a Password. Confirm your password in the second field.
Your account is created immediately as a Member. You'll be signed in and taken to the My Files page.
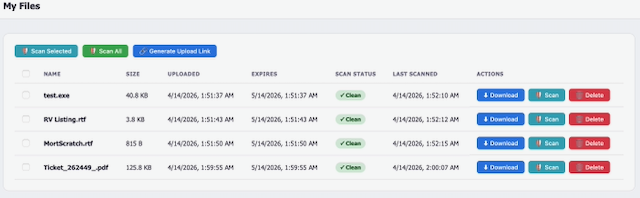
📄 My Files
The My Files page is your home base. It shows all files currently stored in your account with the following information for each file:
| Column | What It Shows |
|---|---|
| Name | The original file name as it was when uploaded. |
| Size | The original file size before encryption. |
| Uploaded | The date and time the file was uploaded to your account. |
| Expires | The date the file will be automatically deleted (default: 30 days after upload). |
| Scan Status | Shows whether the file has been scanned and the result: Clean, Infected, Pending, or Not Scanned. |
| Last Scanned | When the most recent virus scan was performed. |
| Actions | Buttons to download, scan, or delete the file. |
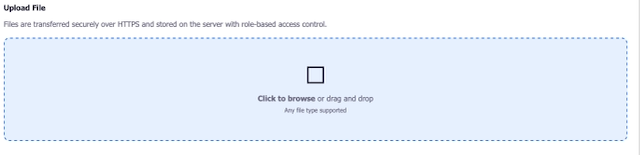
📤 Uploading Files
You can upload files to your Send2Pro account from the Upload page in the sidebar.
Navigate to the Upload page from the left-hand sidebar menu.
Click the upload area to browse your computer, or drag and drop a file directly onto the upload zone. Any file type is supported.
A progress bar will appear showing the upload status. Once complete, the file will appear in your My Files list.
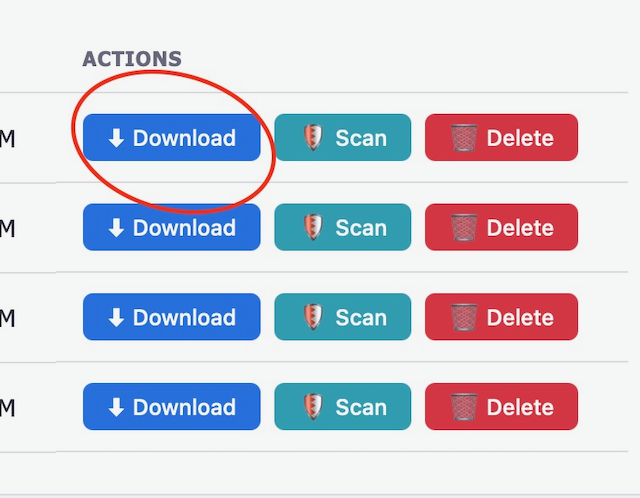
📥 Downloading Files
To download a file from your account:
Click My Files in the sidebar to see your file list.
In the Actions column for the file you want, click the Download button. The file will be saved to your browser's default download location.
🗑 Deleting Files
You can manually delete any file from your account at any time. Deleted files are removed permanently and cannot be recovered.
Locate the file you want to remove in your files list.
Click the red Delete button in the Actions column. The file will be removed immediately.
⏰ File Expiration
Every file uploaded to Send2Pro has an automatic expiration date, set to 30 days after upload by default. When a file expires, it is permanently deleted from the server.
You can see each file's expiration date in the Expires column of your file list. If you need a file to be kept longer, contact your administrator or professional contact — they can adjust the retention period for specific files.
🛡 How Virus Scanning Works
Send2Pro integrates with MetaDefender Cloud by OPSWAT to provide enterprise-grade virus scanning. When you scan a file, it's submitted to MetaDefender and analyzed by 30+ antivirus engines simultaneously — including names like Avira, Bitdefender, ClamAV, ESET, Kaspersky, McAfee, and many more.
Scanning is optional but strongly recommended, especially for files received from external sources via share links. You can scan files one at a time or in bulk.
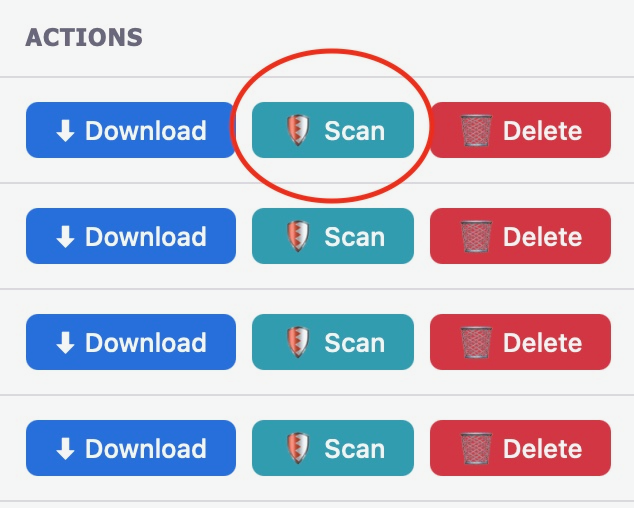
Scan a Single File
Go to the My Files page and locate the file you want to scan.
In the Actions column, click the Scan button (shield icon). The scan will begin and may take up to a couple of minutes depending on file size.
Once complete, the Scan Status column will update to show Clean or Infected. Click on the status badge to see the detailed results from each antivirus engine.
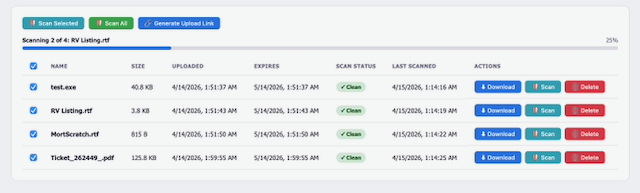
Scan All or Selected Files
You can scan multiple files at once using the batch actions at the top of your file list.
Use the checkboxes to the left of each file to select specific files, or use the Select All checkbox in the table header.
Scan Selected scans only the files you've checked. Scan All scans every file in your account.
A progress bar appears showing how many files have been scanned. Each file's status updates in real time as results come in.
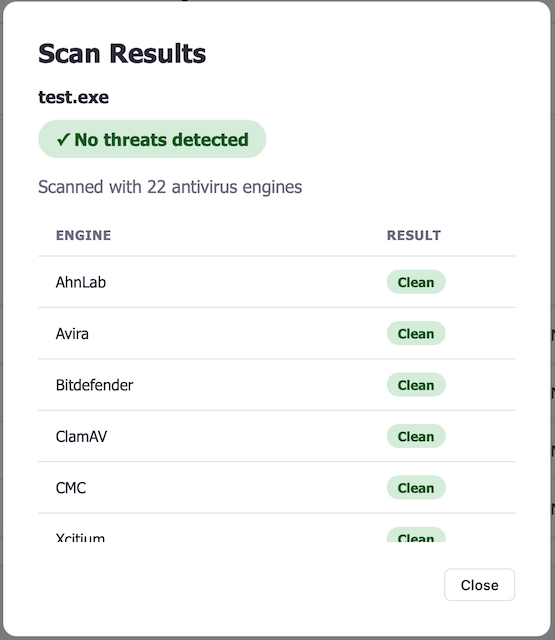
Reading Scan Results
After a scan completes, you can click the scan status badge on any file to open a detailed results modal. This shows:
| Field | Description |
|---|---|
| Total Engines | The number of antivirus engines that analyzed the file (typically 30+). |
| Detections | How many engines flagged the file as potentially malicious. |
| Engine List | Each engine's individual verdict — whether it detected a threat and, if so, the threat name. |
🔗 Generate an Upload Link
Share links let anyone upload files directly to your Send2Pro account — without needing a username or password. This is perfect for receiving files from clients, partners, or anyone outside your organization.
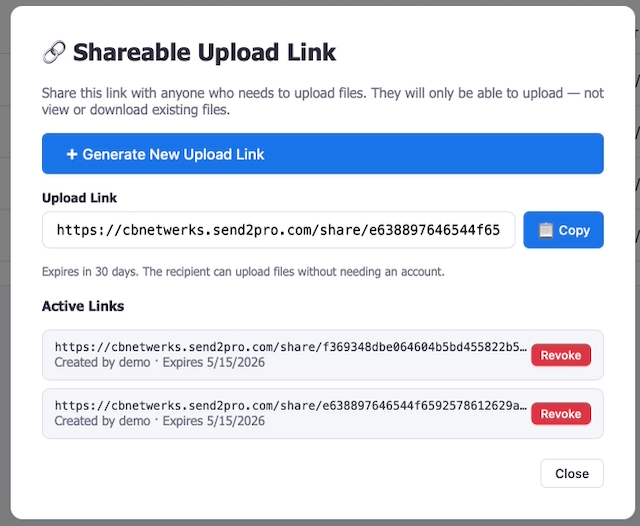
On the My Files page, click the Generate Upload Link button in the action bar at the top.
A modal appears with a unique upload URL. Click Copy to copy it to your clipboard.
Send the link to the person you'd like to receive files from — copy it to your clipboard, or use the built-in Email this link section that appears below the URL to deliver it directly from Send2Pro (see Email an Upload Link).
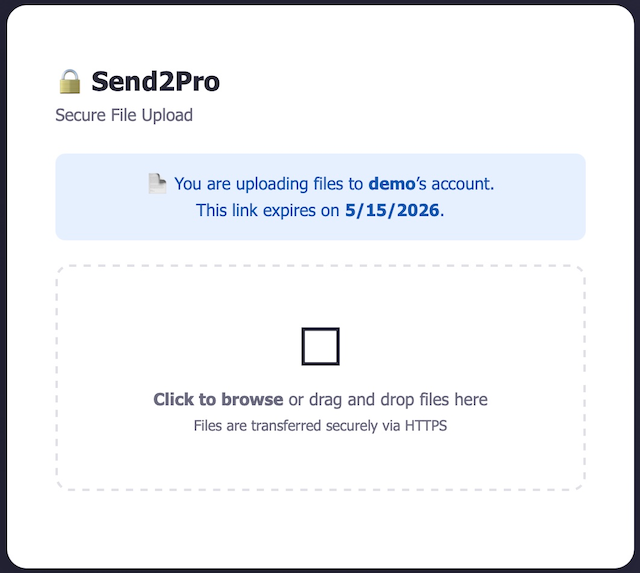
What the Recipient Sees
When someone opens your share link, they'll see a branded Send2Pro upload page. It tells them whose account they're uploading to, when the link expires, and provides a simple drag-and-drop upload zone. They don't need to create an account or sign in.
Once the sender uploads their files, they'll appear in your My Files list automatically. We recommend scanning any files received via share links before opening them.
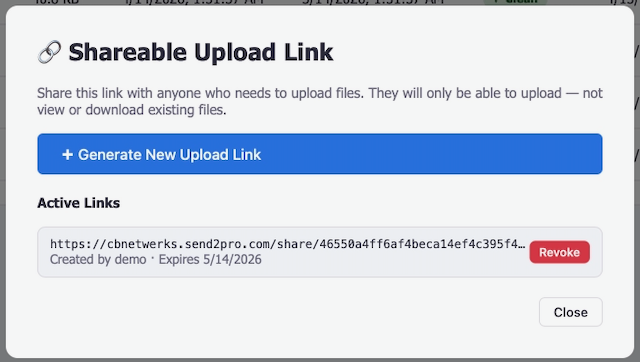
Managing Active Links
You can view and manage all your active share links from the share link modal. Each link shows when it was created, when it expires, and gives you the option to revoke it.
Click Generate Upload Link on the My Files page to open the modal.
Below the link generator, you'll see a list of all your active (non-expired) share links with their creation and expiration dates.
Each active link has two buttons next to it: ✉ Email to send that specific link to one or more recipients (see Email an Upload Link), and Revoke to immediately deactivate it. Anyone trying to use a revoked link will see an error message.
🔐 Change Your Password
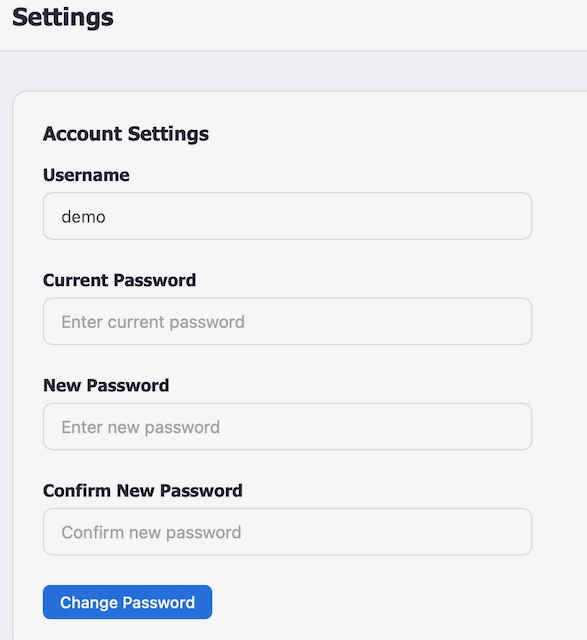
Click Settings in the sidebar under the Account section.
Type your existing password in the Current Password field.
Type your new password and confirm it, then click Change Password.
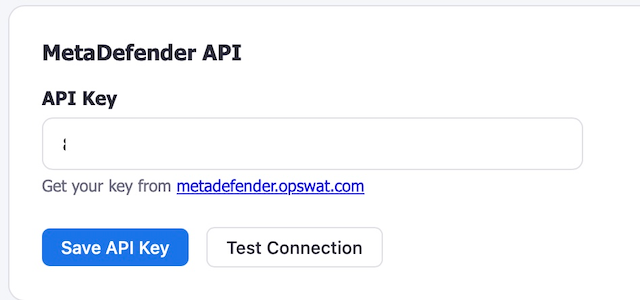
🔑 MetaDefender API Key
If your administrator has not pre-configured a MetaDefender API key, or if you'd like to use your own key, you can set it in Settings.
Visit metadefender.opswat.com and create a free account to get your API key.
Go to Settings, find the MetaDefender API section, paste your key, and click Save API Key.
Click Test Connection to verify the key is valid and MetaDefender is reachable.
📈 Scan Status Reference
| Status | Meaning | What to Do |
|---|---|---|
| Not Scanned | This file has never been scanned. | Click Scan to check it, especially if received from an external source. |
| Pending | A scan is currently in progress. | Wait for the scan to finish. This typically takes 30 seconds to 2 minutes. |
| Clean | No threats were detected by any antivirus engine. | The file is safe to download and open. |
| Infected | One or more antivirus engines flagged this file as malicious. | Do not download or open this file. Contact your administrator. |
🔧 Troubleshooting
"Your connection is not private" warning
This appears when your Send2Pro instance uses a self-signed SSL certificate (common for local or test setups). Click Advanced → Proceed to [site] to continue. Your connection is still encrypted. On production instances with a proper domain (e.g., yourcompany.send2pro.com), this warning should not appear.
Scan fails or times out
This usually means the MetaDefender API key is missing, invalid, or the service is temporarily unreachable. Go to Settings and click Test Connection to diagnose the issue. If the connection fails, try saving a new API key or check your internet connection.
"MetaDefender not connected" message
The Virus Scanner page shows the current MetaDefender connection status. If it says Disconnected, check your API key in Settings. If you don't have one, visit metadefender.opswat.com to sign up for a free key.
File doesn't appear after upload
Refresh the page and check the My Files section. If the upload progress bar completed but the file isn't listed, there may have been a network interruption. Try uploading again.
Share link says "expired" or "invalid"
Share links expire after 30 days. If you need to receive files, generate a new link from the My Files page. If the link was revoked by you or your administrator, it will also show as invalid.
Share link email didn't arrive
Ask the recipient to check their spam or junk folder — emails come from notifications@send2pro.com. If the toast on the dashboard said "Sent to 1, failed for 1 (address@example.com)", the address listed is the one the mail server couldn't deliver to; double-check it for typos. If none of the recipients received anything after multiple attempts, contact your administrator — there may be a mail-server issue on the Send2Pro host.
Can't log in with my credentials
Double-check your username and password for typos. Usernames are case-sensitive. If you've forgotten your password, contact your administrator — they can reset it for you from the Admin Dashboard.
❓ Frequently Asked Questions
How long are files kept?
Files are stored for 30 days by default, after which they are automatically deleted. Your administrator or professional contact can adjust this period for specific files if needed.
Is there a file size limit?
There is no hard-coded file size limit in Send2Pro itself. However, very large files may be limited by your server's configuration or available disk space. Contact your administrator if you need to upload unusually large files.
Can other people see my files?
No. Your files are only accessible to you, your administrator, and any professional account that has been assigned to you by the admin. Other regular members cannot see or access your files.
Are my files encrypted?
Files are transferred over HTTPS (encrypted in transit) and stored on the server. The connection between your browser and the server is encrypted using TLS/SSL.
Can I use Send2Pro on my phone?
Yes. Send2Pro's interface is responsive and works in mobile browsers. Simply navigate to your Send2Pro URL on your phone's browser, sign in, and you can upload, download, and manage files just like on a desktop.
What happens if I don't scan a file?
Nothing — scanning is optional. However, it's strongly recommended to scan any files received from external sources (e.g., via share links) before opening them on your computer.
Can I get back a deleted or expired file?
No. Once a file is deleted (manually or by expiration), it is permanently removed from the server and cannot be recovered.
Does the person who receives an emailed share link need a Send2Pro account?
No. Emailed share links work exactly like links you copy-and-paste yourself — the recipient clicks the button in the email, lands on a branded upload page, and can upload files without signing up for anything. They can't see or download existing files in the account, only upload new ones.
How many people can I email a share link to at once?
Up to 25 recipients per send. Duplicate addresses are ignored automatically. If you need to reach more than 25 people, just click Send Email again with a fresh batch.